Last updated: November 20, 2026
Quick answer: Most home machines can be cleaned in about 10 to 20 minutes, and oiling—if your manual allows it—usually takes only a few tiny drops. For How to Clean and Oil a Sewing Machine at Home, the safest routine is to unplug the machine, remove lint from the bobbin area, and add oil only to the points your manual shows. If the machine is already making grinding noises or refusing to form stitches, stop here and use the manual or a technician instead.
Key takeaways
- Lint is the main thing to remove first, because it builds up around the needle plate and bobbin case.
- Sewing machine oil goes only where the manual allows it, and usually only a tiny drop at a time.
- The needle plate and bobbin area are the spots that collect the most fuzz, thread bits, and dust.
- A light cleaning done on a regular routine is safer than a deep clean that pulls apart parts you cannot put back.
- If the machine is a newer model with sealed parts, oiling may be unnecessary or limited.
What do you need before you start?
You need a lint brush, a small screwdriver if your needle plate needs one, a soft cloth, and sewing machine oil. A flashlight helps you see the bobbin area clearly, and the manual tells you which parts can be opened and which parts should stay closed. For model-specific guidance, check your machine’s manual and the manufacturer’s maintenance page, such as Brother support or Janome’s machine care resources.
Set the machine on a flat table and unplug it before you touch anything. That one step matters more than any polish or cleaner, because you are working near the needle bar and moving parts. If the machine was in use for a while, let it cool for a few minutes so oil and metal parts are not warm to the touch.
Keep only a few tools on the table. A cotton swab, canned air, or household oil sounds useful, but those are common mistakes on a sewing machine. Canned air can push lint deeper into the body, and kitchen oil or general-purpose oil can gum up the mechanism.
If the manual is missing, look for the model number on the body and find the maintenance page from the manufacturer before you remove covers. That matters because some machines need oil in very specific spots, while many newer home models need little or no oil at all. The wrong oiling habit can create more problems than dirt.
How do I clean a sewing machine step by step?
You clean a sewing machine by removing lint from the needle area, opening the bobbin area, brushing out the fuzz, and wiping the surfaces before you oil anything. Each step should be small and deliberate, because the goal is routine maintenance, not repair work. For general cleaning advice, the Sewing Machine Maintenance entry at Britannica is a useful overview.
-
Unplug the machine and remove the needle, presser foot, and thread.
This clears the work area and lowers the chance of catching thread or pricking your finger while you clean. -
Remove the needle plate with a screwdriver if your model uses one.
This opens the top of the bobbin area so you can reach lint that hides under the plate. -
Brush lint from the needle plate, feed dogs, and bobbin case with a lint brush.
Short strokes work better than hard scrubbing, and the loose fuzz should come away in visible clumps. -
Lift out the bobbin case only if your manual shows that it is removable.
This lets you clear the ring of lint that often builds up under the case and around the hook area. -
Wipe the visible parts with a dry, soft cloth.
This removes dust and fine thread bits without leaving moisture in the mechanism. -
Inspect the bobbin area for broken thread, bent pins, or loose fuzz before you close it.
Because the area can hide a broken thread or a bent pin, check that it looks clean and open before you reassemble it. -
Replace the needle plate and parts in the same order you removed them.
A careful reassembly keeps the machine aligned and ready for the next use.
A light cleaning like this is enough for many home machines after a project with heavy lint, such as flannel or fleece. A machine used only for short household repairs may need less frequent attention, while a busy machine can need a quick brush-out after a few sessions. The point is to keep debris from building up until the bobbin area starts dragging. In many homes, a 10-minute clean after a lint-heavy project is enough.
Two sources worth checking for maintenance guidance are the manufacturer’s manual for your exact model and the maintenance instructions from brands such as Brother and Janome. Those pages matter because oil points and removable parts vary by model, and a generic cleanup guide cannot tell you which screws or covers belong on your machine. For oiling guidance, consult Singer’s machine care support as well as your manual.
Where do I put oil in a sewing machine?
You put oil only on the points listed in the manual, usually in the moving metal spots near the bobbin area or hook assembly. If the manual does not show an oil point, do not guess, because some home sewing machine models are designed to stay dry.
Use sewing machine oil, not all-purpose household oil, and add only a tiny drop at each listed point. One drop is enough in most cases; more oil can seep onto fabric, thread, or the belt area and leave stains. After oiling, turn the handwheel slowly by hand so the oil spreads through the moving parts before you stitch.
A good rule is to oil after you clean lint, not before. Dirt and oil together make a sticky paste that traps more fuzz, especially around the bobbin case and hook. If old oil has turned dark or thick, wipe the area clean first and then apply fresh oil sparingly.
Some machines need no oil at all in the user-accessible areas. That is common on many modern home models, and it is one reason a manual matters more than a guess from memory. If your machine is under warranty or still has a sealed body, opening the wrong cover can cause damage that cleaning will not fix.
What parts should I clean but never oil?
You should clean the needle plate, feed dogs, bobbin area, and thread path, but never oil parts that the manual does not name. The needle, bobbin, thread guides, tension discs, and presser foot area are common places people touch, yet they are not oil points on most home machines.
The feed dogs need lint removed, not oil added. Oil on those teeth can stain fabric and make the feed surface slippery, which defeats the point of cleaning. The same is true for the tension discs: they need to stay clean and dry so thread can move through them with steady drag.
Do not oil rubber belts, plastic covers, or any electrical parts you can see near the motor. Those parts are not designed for oil, and excess liquid can collect dirt or weaken materials over time. If a part looks dry and does not appear in the oil diagram, leave it alone.
A simple comparison helps here:
| Part | Clean it? | Oil it? | What to do instead |
|---|---|---|---|
| Needle plate | Yes | No | Brush lint away and wipe dry |
| Bobbin case | Yes | Only if manual says so | Remove thread scraps and dust |
| Feed dogs | Yes | No | Brush out lint between the teeth |
| Tension discs | Yes | No | Pass thread through clean, dry discs only |
| Visible moving metal points | Yes | Yes, if manual allows | Add a tiny drop of sewing machine oil |
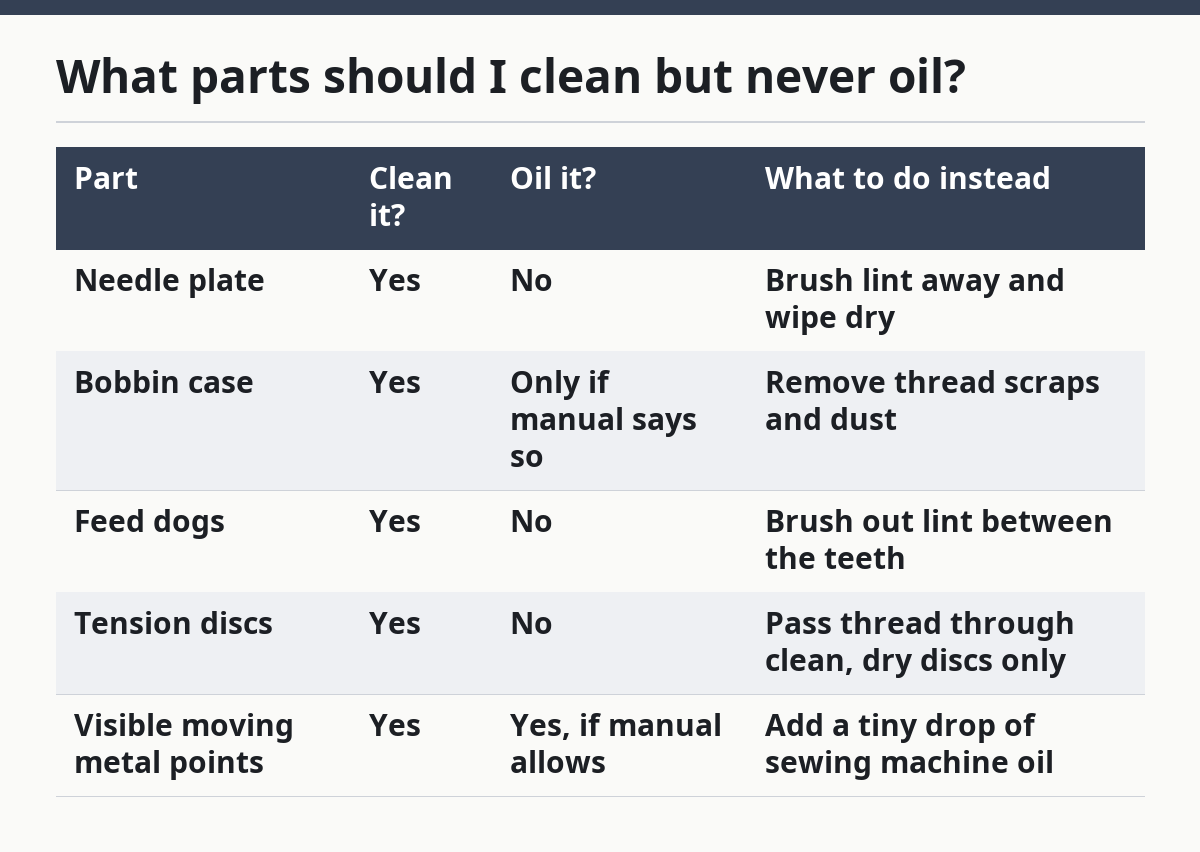
This is the part many generic guides get wrong. They treat every moving area the same, but sewing machines are picky about where oil goes. If the manual is unclear, the safer choice is to clean only and skip oil until you can confirm the oil points with the manufacturer or a repair professional.
How often should I clean and oil a sewing machine?
You should clean the lint out often and oil only as often as the manual says. A machine used for frequent sewing will collect fuzz faster than one used for light mending, so the right routine depends on use, fabric, and the model’s design.
A practical home rhythm is to brush the bobbin area after dusty or fuzzy fabrics and do a deeper clean of the needle plate and bobbin case when lint becomes visible. If the machine starts sounding dry, the handwheel feels less smooth, or thread paths look dusty, that is a sign to inspect it before the next project. The noise may come from dirt, but it can also mean a part needs service, so do not force the machine through it.
The oil side is different. Many machines need oil only at specific points and only after long use, while some sealed models need none in the areas a user can reach. That is why “oil it every week” is bad advice for most homes. It can over-oil a machine that does not need it.
If you want a simple rule, clean more often than you oil. Cleaning is usually the safer habit, and it solves the most common buildup around the bobbin area and needle plate. Oiling should be a smaller, model-specific step, not a reflex.
What mistakes should I avoid?
You should avoid using the wrong oil, over-oiling, and skipping the bobbin area, because those mistakes create more mess than maintenance. They also waste time, since a machine with sticky lint may need a second cleanup after the first one.
The most common error is using a household lubricant or vegetable oil. Those products are not made for sewing machine maintenance and can turn gummy after a short time. Another mistake is opening covers or removing parts without checking the manual first, which can put the bobbin case back in the wrong position.
A third mistake is blowing lint deeper into the body with air. A lint brush lifts debris out; air often pushes it into corners you cannot reach. A fourth is oiling every shiny piece you can see, which can stain fabric and attract dust.
The safest habit is slow, dry cleaning first, then a tiny amount of the correct oil only where the manual says. If a part looks damaged, bent, or seized, stop there. Cleaning is not a fix for broken hardware, and forcing the issue can make a small problem worse.
What should I do after cleaning and oiling?
You should run the machine by hand first, then stitch on scrap fabric before starting a project. That checks whether the handwheel moves freely and whether any extra oil has reached the needle path or fabric side.
Turn the handwheel slowly through several full cycles. Because the motion should be smooth, any gritty or stiff feel is a sign to stop and inspect the machine again. If you see oil on the needle plate or hear a scraping sound, stop and wipe the area again before sewing.
Use a scrap of fabric that you would not mind ruining if a trace of oil is still present. A short test seam tells you whether the machine is ready for real work. If the thread path looks clean and the bobbin area stays dry, the maintenance is done.
Put the lint brush and screwdriver back with the machine so they are ready next time. A maintenance routine works best when the tools stay near the machine, not in a drawer across the room. That small habit makes cleaning before the next project much easier.
FAQ
How often should I clean a sewing machine?
A sewing machine should be cleaned whenever lint starts to collect in the bobbin area or after a project that sheds a lot of fuzz. A light brush-out can be part of normal routine maintenance, while a deeper clean of the needle plate and bobbin case is for visible buildup. The machine itself will tell you when it needs attention through dust, drag, or extra noise.
Where do I put oil in a sewing machine?
You put oil only on the oil points shown in the manual for your exact sewing machine. Those spots are usually near moving metal parts in the bobbin area or hook assembly, and many modern home models have very few or no user-serviceable oil points. Use sewing machine oil and only a tiny amount.
What parts should never be oiled?
You should never oil parts the manual does not name, including the needle, feed dogs, tension discs, rubber belts, plastic covers, and electrical parts. Those areas need to stay clean and dry so thread moves correctly and dust does not cling. If a part is not listed as an oil point, leave it alone and clean it only with a brush or dry cloth.
Can I use canned air to clean a sewing machine?
It is better not to use canned air as your main cleaning method. Air can push lint deeper into the machine instead of removing it. A lint brush and dry cloth are the safer starting tools.
What if my machine still sounds rough after cleaning?
If the machine still sounds rough after a careful cleaning and the correct oiling points were checked, stop sewing and consult the manual or a repair technician. A rough sound can mean a bent part, a timing issue, or a service problem that cleaning cannot fix.
How do I know if my machine needs oil?
Check the manual first, because some home sewing machines are not meant to be oiled by the user. If the manual shows oil points, add only a tiny drop to each one. If no oil points are listed, do not oil it.
Drafted with AI; not yet reviewed by a person.