Last updated: November 18, 2026
Quick answer: use 1 sharp cutting tool, 1 flat surface, and 2 to 3 pattern weights to cut sewing pattern pieces cleanly. How to Cut Sewing Pattern Pieces Cleanly starts with keeping the paper flat, using sharp fabric scissors or a rotary cutter on a mat, and cutting just outside the line you need to keep. Clean edges come from control, not speed, and the mistake to avoid is lifting the paper while you cut.
Key takeaways
- A clean cut starts with flat pattern paper and the right cutting tool, not with faster hand movement.
- Fabric scissors are best for paper pattern edges that need tight curves and small turns.
- A rotary cutter works well on long, smooth lines, but it needs a mat under the paper.
- Pattern weights help hold a paper pattern still so the edge does not creep as you cut.
- If a pattern edge looks fuzzy or torn, the problem is usually dull blades, shaky paper, or trying to cut too many layers at once.
What makes a clean cut?
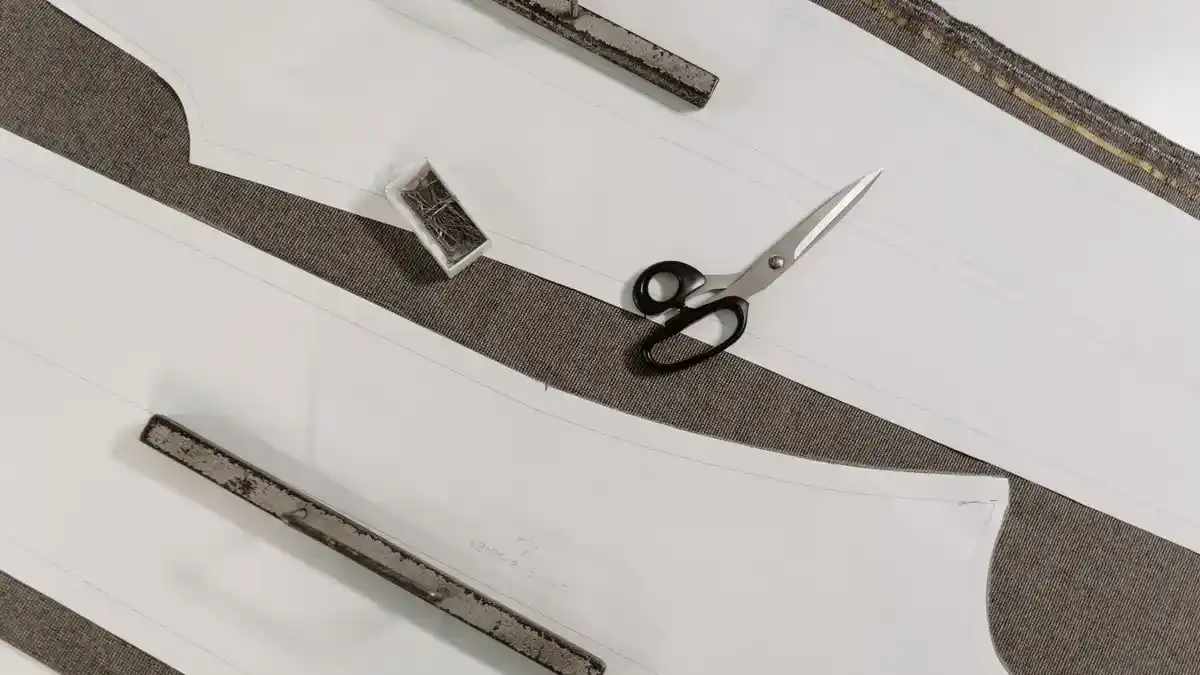
A clean cut means the paper edge stays true to the pattern line without ragged tears, hooks, or jagged corners. For How to Cut Sewing Pattern Pieces Cleanly, that matters because a rough edge can shift the paper by a few millimetres and make the next step harder.
The simplest rule is to keep the cutting line visible and keep the pattern still. Use a sharp pair of fabric scissors for small curves and a rotary cutter for long, straight runs on a cutting mat. If you are working with a paper sewing pattern, the goal is a smooth edge you can trace, pin, or store without extra fray at the corners.
The tool matters, but the hand motion matters too. Cut with the lower blade of the scissors or with a single steady pass of the rotary cutter, and do not saw back and forth. Back-and-forth motion bends the paper before the blade reaches it, which leaves a rough edge instead of a crisp one. For rotary cutter safety and blade care, OLFA’s guide is a useful reference: https://olfa.com/pages/rotary-cutter-safety.
A clean cut also starts with the right side of the line. Pattern lines often have several markings close together, and you only want one edge. If the line is bold, follow the outside or inside edge the pattern tells you to use. If the line is fine, stay consistent on every piece so all matching pieces stay the same size.
How do you cut sewing pattern pieces cleanly?
You cut sewing pattern pieces cleanly by anchoring the paper, choosing the right blade, and following one continuous edge at a time. The method is simple, but each step protects the paper from shifting or tearing.
- Flatten the sewing pattern with your hands on a hard, clean surface for 30 seconds, then smooth out the corners so the paper lies flat.
- Secure the pattern with pattern weights at 2 or 3 points near the edge you plan to cut. If the paper is delicate, consult a sewing professional before adding more pressure near the edge.
- Choose fabric scissors for curves or a rotary cutter on a cutting mat for long edges.
- Position the blade so it starts just outside the paper edge you need to keep.
- Cut in one steady motion, turning the paper with your free hand instead of forcing the blade around the corner.
- Trim any small tabs or clipped corners after the main cut is done, so the edge stays even.
- Check the finished piece against the pattern shape before stacking it with the rest of the set.
The main idea is to move the paper less than you move the tool. If you pull the paper toward the blade, the edge ripples. If you turn the sheet a little at a time, the cut stays cleaner around curves and notches.
For paper pattern pieces with long outer edges, a rotary cutter can be efficient and neat. It is strongest on straight lines and broad curves, while scissors give you more control on tight corners and small seam allowances. Using both tools on the same project can work well when the shape changes.
Which tool gives the cleanest edge?

The cleanest edge depends on the shape, but fabric scissors are usually safer for detail and a rotary cutter is often cleaner for long runs. That trade-off matters because the wrong tool can make the edge look shredded even when the line is correct.
| Tool | Best for | Limits | Clean-cut advantage |
|---|---|---|---|
| Fabric scissors | Curves, corners, small tabs, paper pattern pieces | Slower on long edges | Good control on tight shapes |
| Rotary cutter | Long straight lines and broad curves | Needs a cutting mat | Very even edge on smooth runs |
| Pattern weights | Holding paper still | Does not cut anything | Keeps the pattern from shifting |
| Cutting mat | Rotary cutting support | Not needed for scissors | Protects the surface and blade |
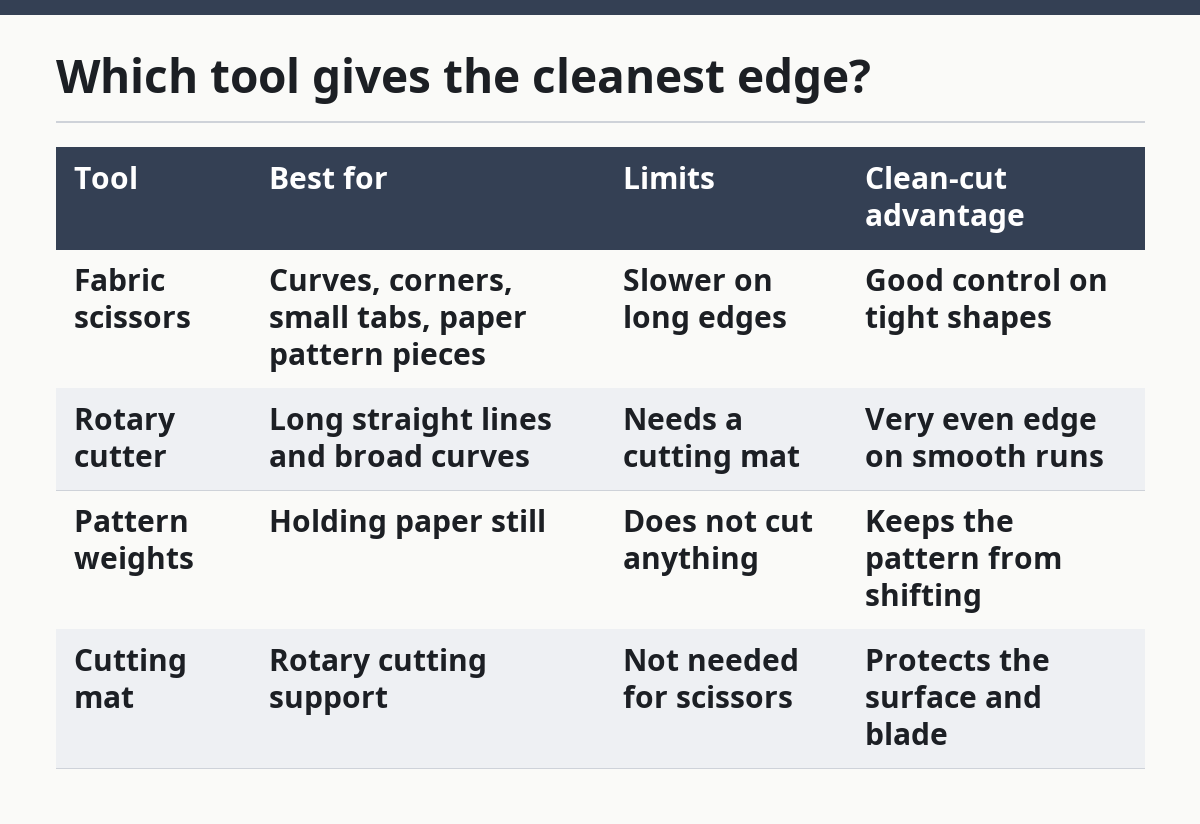
Use fabric scissors when the pattern piece has a neckline, armhole, or small notch that needs a careful turn. Use a rotary cutter when the edge is long and the paper can stay flat on a cutting mat. Pattern weights help either tool by stopping the paper from sliding, which is one of the main causes of crooked cuts. Fiskars’ scissors guidance is also useful when you want a manufacturer’s view on blade care and cutting control: https://www.fiskars.com/en-us/crafting-and-sewing/tips-and-techniques/scissor-care.
Do not try to force one tool to do everything. Scissors can leave a jagged edge if you rush a long line, and a rotary cutter can skid on a bent corner if you try to turn too tightly. A good choice is the one that keeps the blade on the line without stopping every few centimetres.
How do you keep paper patterns from shifting?
You keep paper patterns from shifting by pinning them down with weights and cutting in small sections. A paper sewing pattern that moves even a little can throw off the edge and make matching pieces harder later.
Pattern weights are the simplest fix. Place them at the corners and along the longest edge, with one weight close to any curve you plan to cut. If the paper is light, add more weights rather than pressing harder with the blade.
A cutting mat helps when you use a rotary cutter because it gives the blade a stable base. That stability matters on pieces that are long enough to curl at the ends. If the mat is too small for the full piece, move the paper and cut in sections instead of hanging half the pattern off the edge.
Paper patterns also stay cleaner when the sheet is unwrinkled before you start. Fold marks and old creases make the paper spring up while you cut. Smooth them with your hands first, then place the weights. That takes less time than fixing a torn edge later.
This is the part many generic guides skip: the paper itself is part of the cut. A perfect hand motion cannot fix a lifted corner. If the pattern is not held flat, the edge will wander no matter how sharp the blade is. That is why How to Cut Sewing Pattern Pieces Cleanly depends on flat paper first and cutting second.
When should you use scissors instead of a rotary cutter?
You should use scissors instead of a rotary cutter when the line is short, curved, or crowded with marks. The reason is simple: scissors let you make tiny direction changes without dragging the paper across a mat.
A rotary cutter is best when the path is open and smooth. If the edge has many notches, narrow angles, or a tight inner curve, scissors give you better control. That is especially true for paper sewing pattern pieces with corners that need one clean turn, not a series of half-turns.
Scissors are also the better choice when you are cutting only one piece and do not want to set up a mat. A 45 mm rotary cutter on a mat can be efficient, but it is not always the fastest tool for one small piece on a crowded table. For a single paper template, fabric scissors keep the setup simple.
The downside is speed. Scissors can feel slower on large pieces, and dull blades will crush the paper instead of slicing it. If the cut edge starts to look furry, stop and sharpen or replace the scissors rather than pressing harder.
How do you handle paper pattern pieces without tearing them?
You handle paper pattern pieces without tearing them by supporting the paper close to the cut and keeping the blade sharp. Tears usually happen when the paper bends before the blade reaches it, or when dull blades drag through the edge.
Hold the paper with one hand a few centimetres away from the cut line, not right at the edge. That support keeps the sheet from lifting. With scissors, let the lower blade slide along the table so the paper is cut rather than pinched. With a rotary cutter, make one smooth pass instead of repeated short chops.
Keep the paper on a firm surface. A soft surface lets the sheet sink and catch. A cutting mat gives a rotary cutter the support it needs, while a hard table works well for scissors if the pattern is held flat.
If the piece is large, cut it in sections and rotate the paper instead of twisting your wrist into an awkward angle. That helps preserve the line on wide pattern pieces and reduces the chance of a nick at the edge. Clean cutting is mostly about removing strain from the paper and from your hand.
What mistakes make pattern edges ragged?
Ragged edges usually come from dull blades, moving paper, and trying to cut too much at once. Those mistakes affect accuracy first and neatness second.
Cutting with dull fabric scissors can ruin a clean edge. The paper bends before it separates, so the cut looks chewed rather than sliced. A dull rotary cutter does the same thing on a mat, only faster, because it skips instead of rolling smoothly.
Another common mistake is lifting the pattern to “help” the blade around a curve. That seems useful, but it distorts the edge and changes the shape of the piece. Turn the paper a little instead, and keep the blade moving in a steady path.
Stacking too many sheets is also a problem. Paper pattern pieces are thin, but a stack still shifts. If you need more control, cut one layer at a time. That takes longer, but the edge is cleaner and easier to match later.
A final mistake is cutting on the wrong side of the line and then trying to fix it with a second pass. Double-cutting creates small bites out of the edge. If you miss a spot, trim it once with the correct tool and stop.
For broader sewing guidance, the pattern layout, cutting, and marking hub goes deeper into where cutting fits in the full process.
How do you cut fabric accurately from a pattern?
You cut fabric accurately from a pattern by keeping the pattern flat, aligning it to the grain, and making the same careful cut you would use on paper. The paper piece should already be clean before it touches fabric, because any wobble in the pattern edge can show up in the cloth.
Use pattern weights or pins to stop the fabric from drifting. Then cut with fabric scissors or a rotary cutter in one controlled pass, following the pattern edge without lifting the layer you are trimming.
Should I cut pattern pieces one at a time?
You should cut pattern pieces one at a time when the shape is small, curved, or easy to misread. That gives you more control and reduces the chance of copying a mistake across several layers.
Batch cutting saves time only when the paper stays flat and the shape is simple. If the piece has tight corners or important notches, one-at-a-time cutting is safer and cleaner.
What tool is best for cutting sewing patterns?
The best tool for cutting sewing patterns is the one that matches the shape: fabric scissors for curves and detail, rotary cutter for long smooth edges, and pattern weights to hold everything still. There is no single tool that works best for every piece.
If the pattern piece has lots of turns, scissors are usually the cleaner choice. If the edge is long and straight, a rotary cutter on a cutting mat can give a neater line with less hand strain.
A clean cut starts before the blade moves
A clean cut starts with flat paper, a sharp blade, and a clear choice about which tool fits the shape. If the pattern stays still and you cut in one controlled motion, the edge stays truer and the rest of the sewing job gets easier.
The most useful habit is small and ordinary: slow down at the cutting stage by a little, not by a lot. That extra care on a paper sewing pattern can save time later when pieces match, stack, and sew more cleanly on the first try.
FAQ
How do you cut sewing pattern pieces cleanly every time?
You cut sewing pattern pieces cleanly every time by flattening the paper, securing it with 2 or 3 pattern weights, and using one sharp tool with one steady pass.
Is a rotary cutter better than scissors for pattern paper?
A rotary cutter is better for long straight edges, while scissors are better for tight curves and small corners. Both can work well on paper sewing pattern pieces.
Why does my pattern paper keep tearing?
Pattern paper usually tears because the sheet lifts, the blade is dull, or too many layers are being cut at once. Keeping the paper flat reduces that risk.
What is the safest way to cut a sewing pattern?
The safest way is to keep the pattern flat, use a cutting mat with a rotary cutter, and keep your non-cutting hand away from the blade path.
Drafted with AI; not yet reviewed by a person.